When we touched down in the Faroe Islands, Emilia had to pinch herself. Her dream vacation had arrived, six not-so-short years after she read an article about the archipelago in a magazine. In that moment, it seemed effortless.
The reality was far from it.
We get it. It’s easy (and fun!) to list out your dream vacations. Turning that list into a concrete plan can be a struggle. First off, there’s the time it takes to plan. You need to choose activities, and there’s that nagging fear that your dream destination might disappoint. And don’t forget the unfortunate requirement of saving money. It’s a wonder we go on big-ticket trips at all!
Oh, that’s right, we continue to travel because it’s totally and completely worth the stress, time and money.
Over the years, we’ve developed handy tips to streamline planning. Our tips work just as well for big-ticket trips to the Faroe Islands as they do for long weekends in Colorado. This guide will take you through our spreadsheet method for constructing a vacation plan. You’ll learn how to detail every point of your trip to eliminate questions and maximize sightseeing.
We’ll even share a sample spreadsheet that shows how we coordinated our eight-day Faroe Islands vacation.
This approach is so intuitive and easy-to-read that you’ll be able to circulate spreadsheets amongst your friends and family. Prepare to earn massive travel-kudos.
What’s Included:
- Step One: Pick Your Destination and Vacation Length
- Step Two: Research the Details
- Step Three: Make Your Macro Plan
- Step Four: Create a Detailed Travel Itinerary
- Additional Planning Materials
Step One: Pick Your Destination and Vacation Length
The starting point is easy: pick the destination you’re most excited to visit.
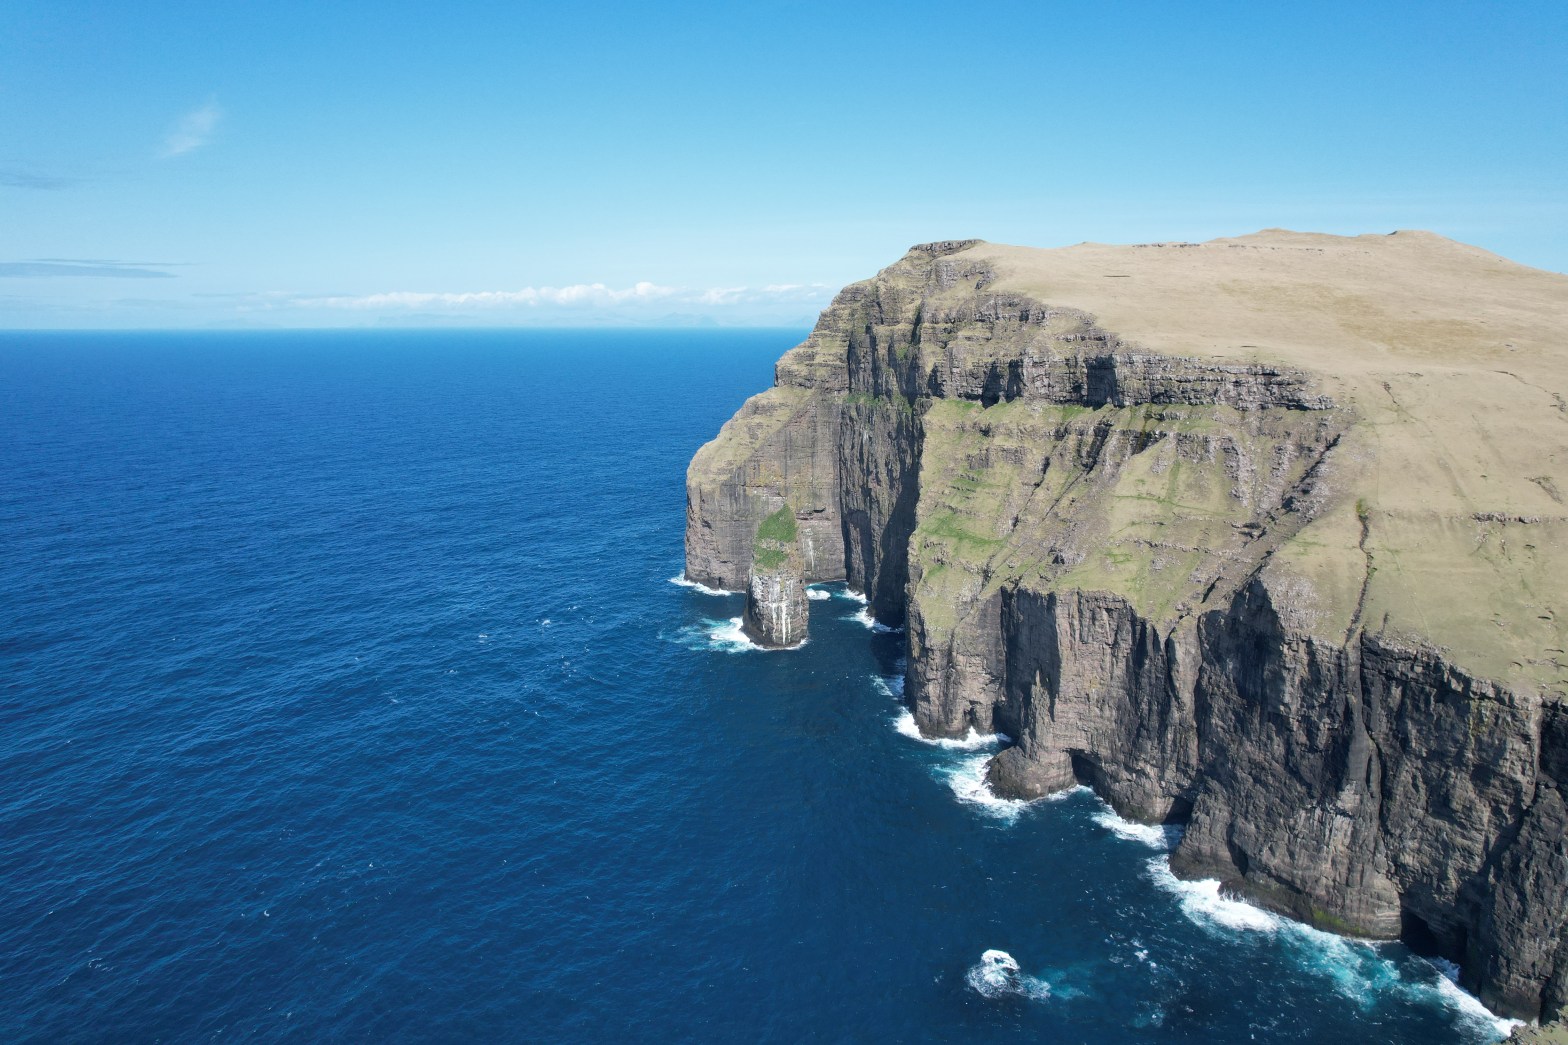
It’s that place you’re dreaming about after discovering it in a movie, on Instagram, or through a friend. Our trip to the Faroe Islands began with a photo of Trælanípan (the famous lake on a cliff above the ocean). We were enchanted. So we decided to see what else the area had to offer. Hiking, scenery, animals and road trips, it turns out.
Next, consider how long you want your trip to be and how long you can reasonably travel for. Scrutinize your calendar, your vacation days from work and how much money you have to spend on travel. Consider where you’re going and how long it will take to get there. This is especially critical if you’re looking at a destination that will take you several days to reach (like our trip to Namibia). Budgeting one week for a destination that will take you four days to reach is not exactly the best use of time, money or carbon.
How we did it: Since the Faroe Islands are relatively small, we decided that we’d be able to see everything we wanted to in about a week. After choosing the length of the trip, we researched flights. From NYC, it takes us about a full day to reach the islands. We chose to leave on a Friday evening flight, then return on the following Sunday, spending about 10 days total on travel.
Step Two: Research the Details
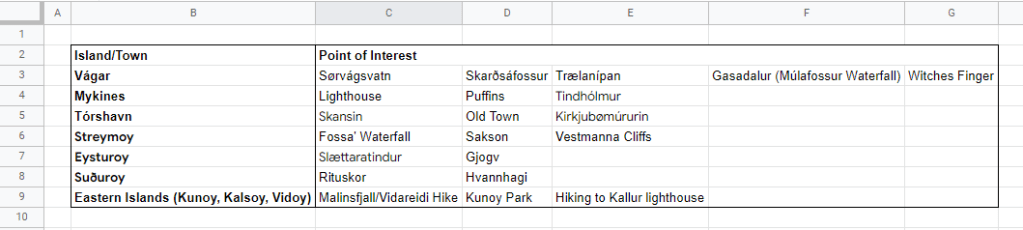
After choosing your destination and trip length, it’s time to research. Browse your favorite blogs, peruse a guidebook, or even just Google for “points of interest”. Start a spreadsheet to sketch out the major attractions and experiences you want to include in your trip.
To make your spreadsheet, organize the activities and attractions you’d like to visit into rows based on their location. Collect as many activities as you’d like and don’t worry about how you’ll fit them all in. You’ll narrow down to a reasonable itinerary in later steps
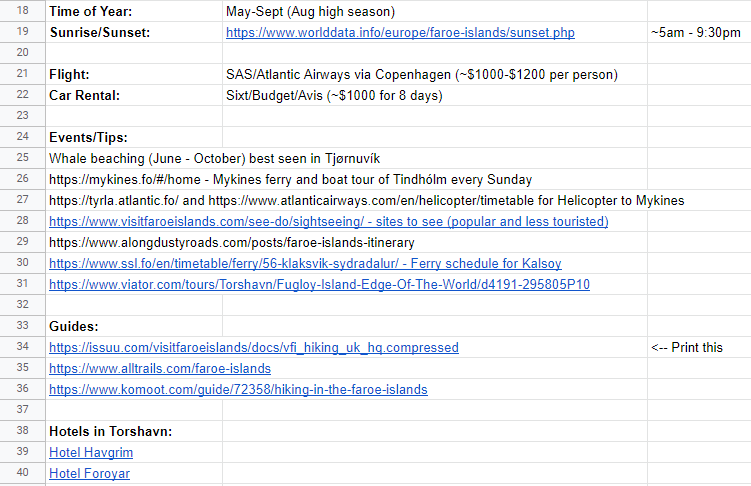
While researching, take notes on opening hours, seasonal closures and peak tourist times. If you’re doing outdoor activities, write down local sunrise and sunset times, or typical weather. Pay attention to the best time of year to visit the place you have picked. Peak tourist season will have the most activities and attractions available, but also the most crowds. Remember that shoulder seasons can offer similar experiences and may be cheaper and less crowded. Include all of this information, as well as any helpful links you want to keep track of, in your spreadsheet to reference later.
How We Did It: For the Faroe Islands, we learned that peak season happens in early summer, when the temperatures are warmest, the weather is best, and there’s plenty of sunlight. However, the tourist season starts as early as May and continues until August. We included this information in our sheet and chose to visit at the very start of the season. Since we knew hiking would be one of our main activities, we made a point to include times for sunrise and sunset in our sheet. Finally, we discovered that the Faroe Islands are prone to fog and bad weather, which we noted for later so that we could build backup plans into our schedule.
Step Three: Make Your Macro Plan
To make your macro plan, break activities into days. Take rows of activities (which you previously sorted by location) and divide them into days. Keep rearranging your activities until you’ve figured out how much time you’ll need to spend in a specific location to comfortably see everything you want to. You’ll fine tune the timing later, so just sketch out what you think you can manage.
Now it’s time to make the spreadsheet. Devote one row per day, then number the days down the first column. Use columns two, three, and four for morning, afternoon, and evening activities. Add one main activity for each day in each of the activity columns. Compare what you want to do against constraints like weather, opening hours and seasonal closures. You may need to arrange activities based on these factors, or remove them all together.

How We Did It: In our spreadsheet, you’ll see that we start to build a plan of how we will work our way across the Faroe Islands. We have penciled in activities we think we can do in each location, and in some cases dedicated multiple days where there were more activities than we could fit in one day. In the far right column, we have a list of activities that we’d like to do, but might not have the time for. We’ve also noted if an activity has time constraints, like limited departures. We leveraged all of the links, guides, and ferry schedules collected in the previous step.
Before taking your plan even more granular, look at all of the activities you’ve picked out and determine how you’ll get to them. Maybe you’ll need to fly into a major city, then rent a car to get around. Or perhaps you can take a train, local bus, or boat between locations. If you’re thinking of renting a car or flying between locations, research the possible cost. You don’t have to book it now, but it’s useful to keep in mind as you build out a detailed itinerary.
Step Four: Create a Detailed Travel Itinerary
At this point, we start breaking the process into manageable, shareable chunks. This lets us split up the planning work, start on sections and come back to the plan later, and generally not get overwhelmed. Our simple solution? Start a new tab on our spreadsheet and build out one day of the vacation at a time.
This new spreadsheet will specify what you’re doing each day, approximately when you’ll do it, and how you will get there. Is it super granular? You bet. But this is critical to ensure you don’t miss a single detail. You don’t want to overcommit or miss an activity because you didn’t get the timing right.
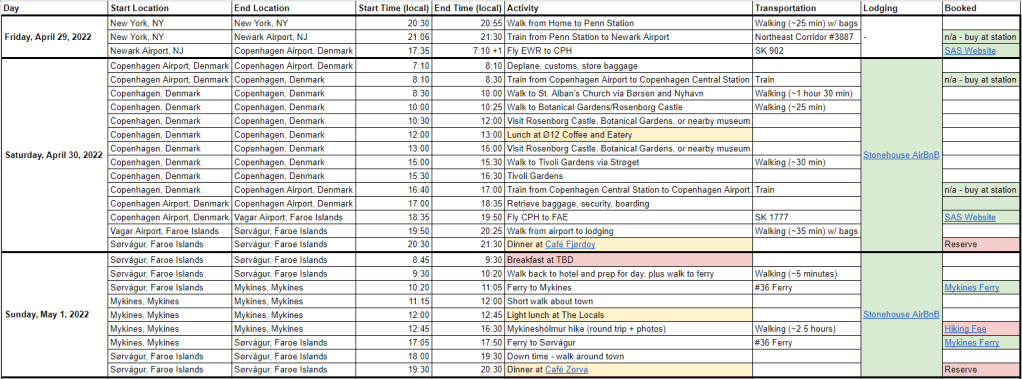
The sheet will lay out the days in the first column, and each row is going to be a single activity within a day. An activity could be going to a museum, having lunch, or driving between two locations.
Start your new sheet with the following columns:
- Day – The calendar day of the trip. Remember to keep track of weekends. The day cell will normally span multiple rows, assuming there are multiple activities in the day.
- Start Location – The place where you’ll start the activity.
- End Location – The place where you’ll end the activity.
- Start Time – When you will start the activity.
- End Time – When you will end the activity.
- Activity – A brief description of what you’ll be doing
- Transportation – If transportation is required (ex. Fly from New York City to Copenhagen), note any relevant details. Generally this is a flight number, train number, or a note on the time it will take to drive or walk someplace.
- Lodging – Where are you staying for the night. The lodging cell will normally span multiple rows so that it aligns in height with the “Day” cell.
- Booking – Where you need to book the activity and whether you have already booked it. We denote this by coloring the cell, and changing the color once a booking has been made.
You may also want to keep a notes column at the end of your table to write details that aren’t covered in the other columns.
Here’s the first few rows of our Faroe Islands trip spreadsheet:
Additional Planning Materials
Some trips may require additional planning materials. Maps, cooking plans, and a packing list are just a few of the additional items you may want to keep track of.
A big road trip, like our self-drive around Namibia, benefits from planning the route ahead of time. Planning the route ensures you go past towns, parks, or other sites you want to visit. If you leave it up to Google, you’ll likely find yourself on the fastest and least scenic route. We prefer to pre-plan our travel routes using Google My Maps, which allows you to drop pins, add driving routes, draw lines, and measure distances, then save your work so you can access it offline.
A packing list is essential for every trip and can easily be added as an additional sheet to your trip plan. Having a list will ensure that you don’t forget anything on your way out the door, especially for trips that require specialty items such as mosquito head nets for summer trips to Alaska, hand warmers for trips to Svalbard, or hiking boots for the Faroe Islands. Anything you need for your trip will become apparent as you research and refer to your plan, so it’s useful to keep the packing list close.
Download the Full Itinerary
Inspired to travel to the Faroe Islands yourself but want a head start? Download the complete one week itinerary we planned below and use it to jump start your own travel plans!

2 thoughts on “How to Plan Your Ultimate Vacation (with Faroe Islands Itinerary)”