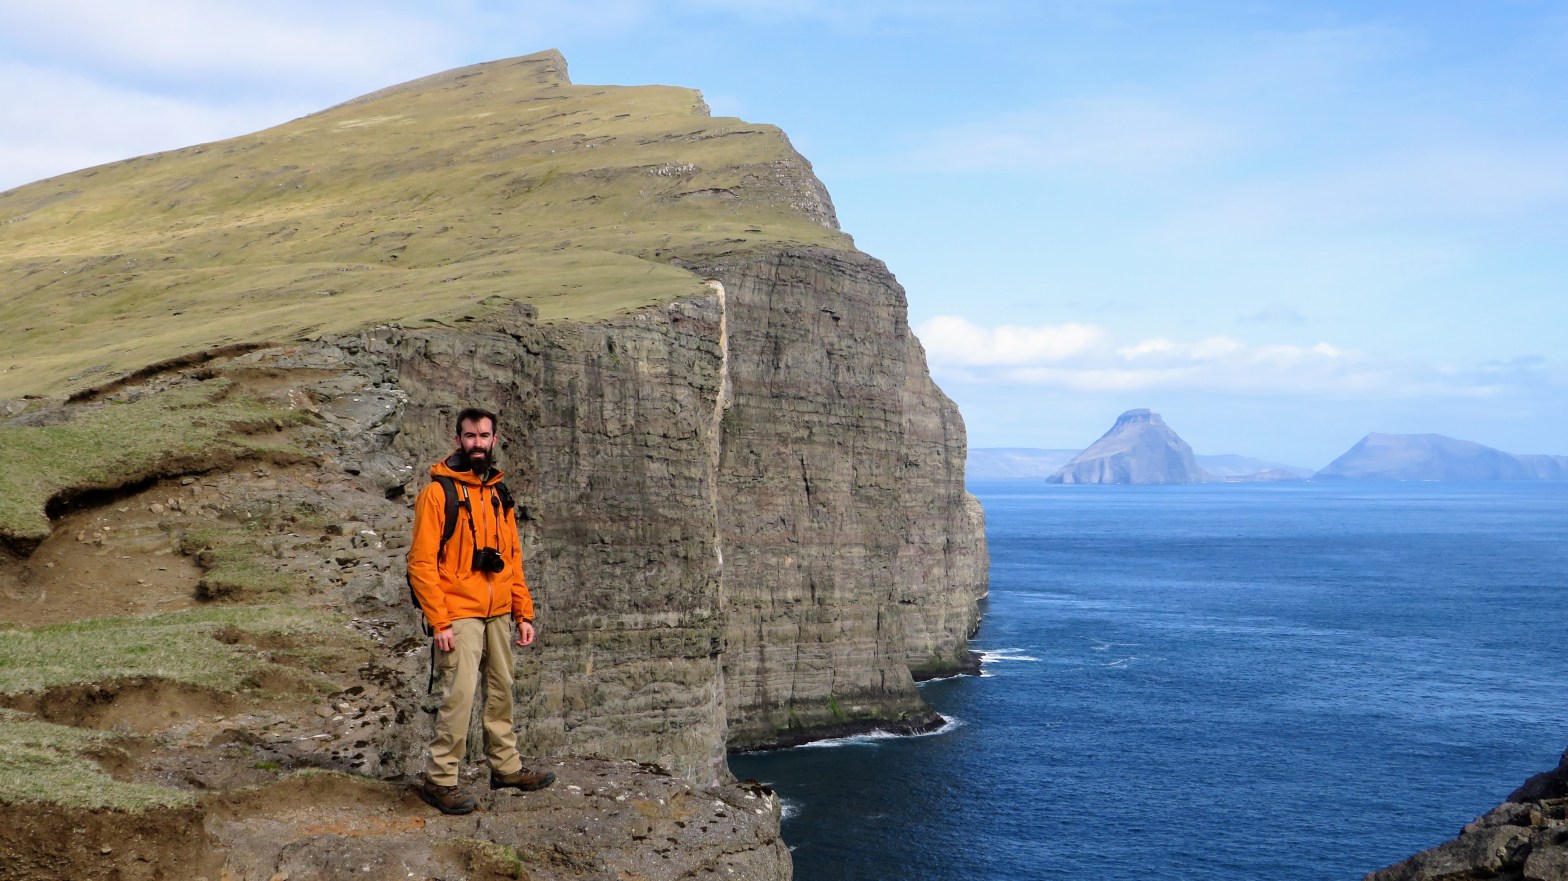
Hiking is etched into the landscape of the Faroe Islands. Before tunnels shuttled cars under mountains and from one island to another, locals trekked up and down cliffs to see each other. It sounds improbable, and it feels just as improbable when you’re on a trail, looking down at your destination a hundred meters below.
Going on a day hike is one of the most satisfying ways to immerse yourself in the Faroe Islands’ landscapes. Despite the archipelago’s compact size, there are hikes to suit a range of skills and ages. You can stroll around Sørvágsvatn, or summit Slættaratindur, the tallest mountain in the Faroe Islands. You can do a multi-day trek across the southernmost island Suðuroy, or catch a ferry from Tórshavn for a day’s long walk down Nólsoy.
The Faroe Islands’ tourism board has a comprehensive hiking guide. It’s a must-download for every visitor. But it does leave out some important details. Not to mention, it treats all hikes as equally worthy, which can be tricky for the visitor with limited time.
This guide will fill those gaps. We’re not going to cover the most famous hikes. Instead, we’ll highlight our favorite ones, and explain the details that aren’t covered in the guide book.
What’s Included:
- What Are the Best Hikes in the Faroe Islands?
- How Hard Are the Hikes in the Faroe Islands?
- Additional Tips
- The Hikes
What Are the Best Hikes in the Faroe Islands?
There are a handful of hikes that belong on every Faroe Islands itinerary. A hike around Sørvágsvatn, just a fifteen minute drive from Vágar airport, is a must, and covered in depth on other blogs, as well as in our own itinerary post
You’ll also want to hike out to the puffins on your day in Mykines. As we explain in our planning guide, we weren’t able to do that during our trip because a landslide had wiped out the trail. If you’re interested in learning more about that hike, we recommend checking out the hiking description on the island’s tourism website.
And, if you’re visiting Kalsoy, you can’t miss the blustery walk to the iconic Trøllanes lighthouse. It’s a great hike, but there are a few details we weren’t able to find online or in our guidebook. Instead, the tips we’re sharing below are ones we got from chatting with a local farmer.
How Hard Are the Hikes in the Faroe Islands?
There are hikes for everyone on the Faroe Islands. However, the landscape means the hikes are probably quite a bit different to the ones you’re used to back home.
Most of the hikes in the Faroe Islands go up the side of a hill and stick close to cliffs that drop sheer into the ocean. If you’re not a fan of heights, a pair of trekking poles can provide steady footing.
We found the trails in the Faroe Islands were typically much narrower than we’re used to in the eastern US. Some trails are repurposed sheep trails, and some are actual footpaths, but very few of them allow for anything other than single-file walking. This makes easy trails a touch more difficult, especially if they’re rocky.
Additional Tips for Hiking in the Faroe Islands
Most towns have a sign highlighting local attractions and nearby hikes. These hikes can range from nice walks to stretch your legs to multi-day treks that go between towns. The hikes are generally rated 1 through 4, where 1s are strolls and 4s are rigorous hikes for the avid trekker. We found that for our level of fitness and interest (we’re young, relatively fit people who like hiking, but aren’t avid, super experienced hikers), 3s were tiring but rewarding.
Lots of the hikes also have trail maps at the trailhead. While the official ones described in the Faroe Islands guide tend to be well marked with regular cairns or blazes, we recommend taking a photo of the official route to have with you. It can be quite easy to confuse a sheep trail with a footpath on some of the less-trafficked hikes.
It’s cliché, but it’s worth repeating: dress in layers and be prepared for every type of weather while you’re outside. It’s possible a fog could roll in while you’re on a mountain. The official advice if that happens is to look for the next trail marker, or stay where you are if you can’t spot it. More likely than not, the bad weather will pass before long. If you want a more complete guide on what to wear, check out our Faroe Islands summer packing list.
Out-and-Back or Loop?
When consulting the Faroe Islands guide, double check whether their estimated time is for a loop or for an out-and-back hike. We found that the time estimates for out-and-back hikes were only quoted for one way. Look at the map, and double check the instructions to maximize your hiking time!
The Hikes
Gásadalur
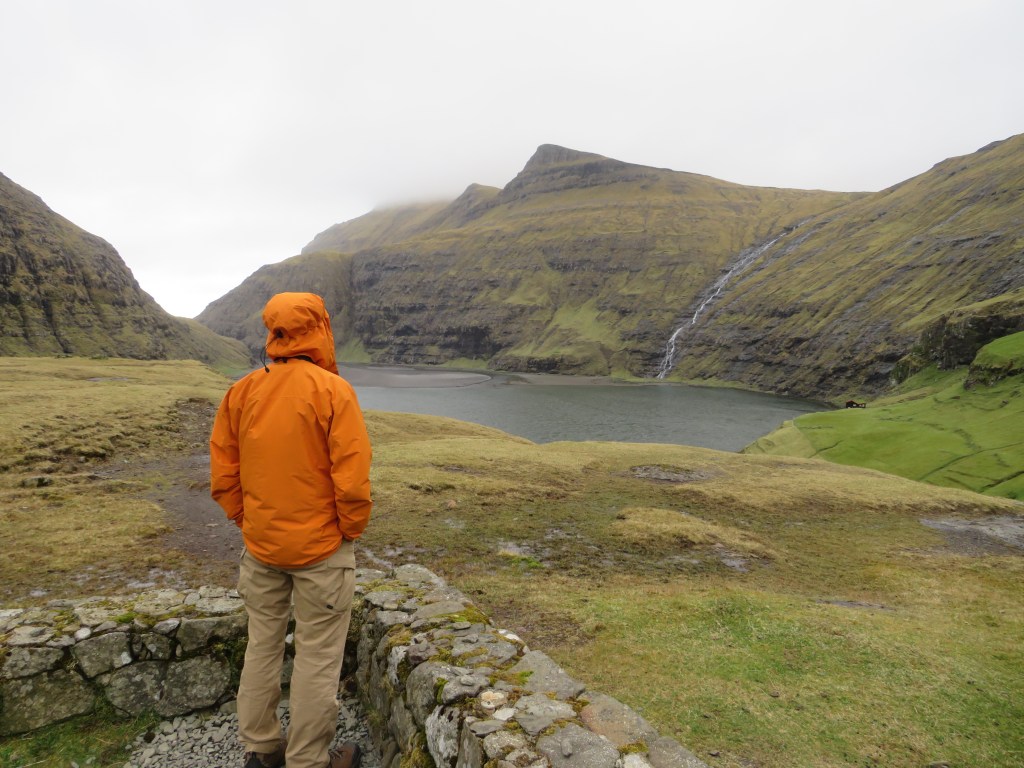
Alex came across this hike in the Faroe Islands hiking guide, and it was one of our favorites. As you walk up the mountain from Bøur (a town on the opposite side of the water from Sørvágur), you’ll have fantastic views of Drangarnir and Mykines. Following a rocky descent, you’ll be rewarded with a fantastic vantage point of Gásadalur’s waterfall plummeting into the ocean.
Before the tunnel was built between Gásadalur and Bøur in 2004, this trail was the only way to get between the two villages on land. There’s no church in Gásadalur and there wasn’t a cemetery either until 1873, which means that people had to transport bodies up the trail you’ll be hiking along to get them to the cemetery in Bøur. Something to think about as you find yourself struggling with just a backpack! Fortunately for the residents of Gásadalur, helicopters have served the village since 1983.

The Trailhead:
The trailhead for the hike to Gásadalur starts in a dirt parking lot just past the town of Bøur. Look for the turnoff into the parking lot on your left, if you’re driving west from Bøur. It’s just before the entrance to the tunnel to Gásadalur. There’s a trail map, but the route up is well marked with wooden markers with blazes.
The Route:
The hike starts by going up the side of a mountain along a cliff edge. It’s steep, but there are stairs worn into the dirt and switchbacks, so you’re not heading straight up.
After about a half hour of climbing, you’ll come to a cairn, where the trail flattens out and skirts the ocean side of the mountain. The scenery turns rocky and otherworldly. After about thirty minutes on this trail, you’ll reach the descent. This is where the trail becomes difficult. The path is narrow, steep and covered with loose rocks of varying sizes. It took us twice as long to walk down the mountain as it did to walk up and over.
As you descend into the valley, Gásadalur comes into view. This waterfall plummeting directly into the ocean appears unimaginably majestic from your vantage point along the trail, and the view up close will surely entice you to rest long enough to let the strain of hiking melt away.
Total distance: 2.2 miles or 3.6 kilometers one way


The Details
The beginning portion of this hike is relatively easy. It’s pretty steep at the beginning, but there are flat portions where you can rest. The dirt trail is relatively wide, but still single-file and very close to the cliff edge. This is where you’ll have the fantastic views toward Drangarnir and Mykines, the perfect excuse to stop your climb and enjoy the scenery. The first portion ends when you reach a flat area with a cairn, a great vantage point for photos.
The second portion skirting around the mountain is quite easy as it is flat. Rocks are strewn along the mountainside, giving it a Martian ambiance. While the trail here is mostly flat, it does flank a slope that drops down into the ocean – something to keep in mind if you’re nervous about heights.
The third portion of the trail is quite difficult and requires care even from experienced hikers. The trail is very narrow and steep with many switchbacks. There are plenty of large rocks, which means that finding solid footing can be a challenge. We advise plenty of time for this portion of the hike. Also factor in the ascent if you’ll be climbing back up.
We cheated on the way back, and walked through the tunnel to our car. This route took about forty minutes, from outside of Gásadalur to the parking lot at the trailhead. While we wouldn’t recommend it (there isn’t much to see), if you find yourself in the position where you need to save time, be aware of cars and make sure someone in your party is wearing bright colors!
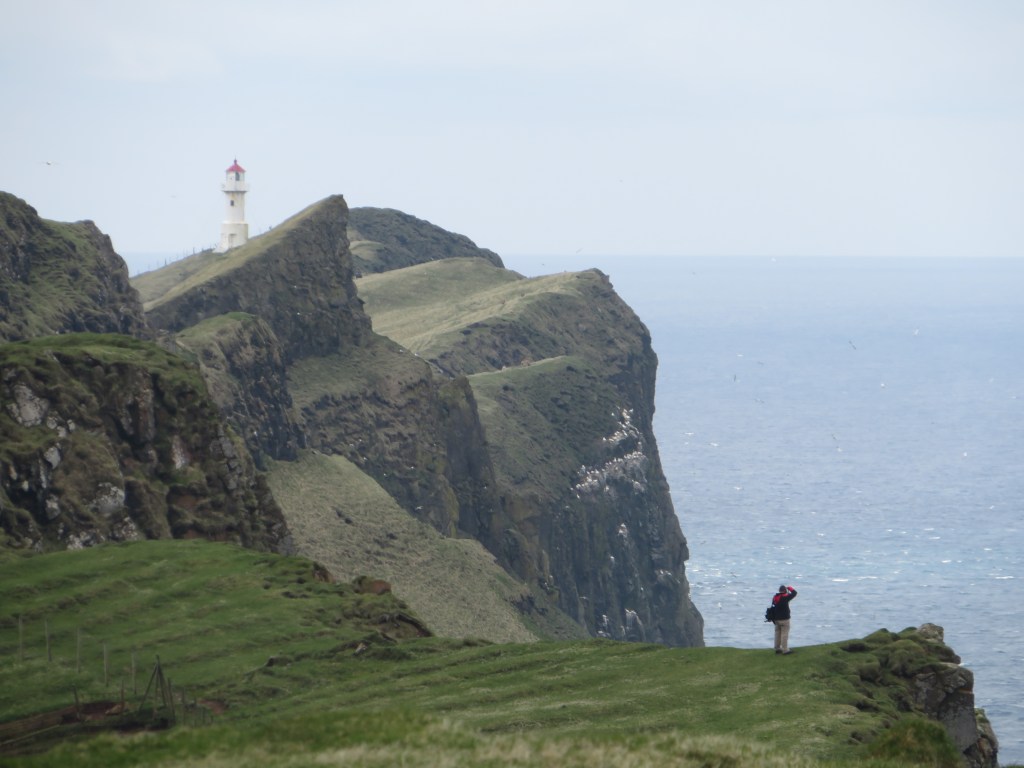
Kallur Lighthouse
On Kalsoy’s northernmost edge sits an improbable windswept lighthouse. Perched on the edge of a cliff, this lighthouse is incredibly photogenic and quite easy to hike to. Unlike the hike to Gasadalur, which is on public land and included in the Faroe Islands’ official hiking guidebook, this hike is on private land and doesn’t have an officially sanctioned route.
We’re sharing the route we took in May 2022, but keep in mind that this information may be out of date during your trip. We spoke to the incredibly lovely (and quite chatty!) farmer who owns the land and he said that he was considering charging for a guided hike to the lighthouse.
The Trailhead:
This hike starts from Trøllanes, Kalsoy’s northernmost town. There are two trailheads you can use for this hike. As this isn’t an official route, there’s no map. Fortunately, it’s a short hike and your destination will be in view for most of the walk, so a proper trail map isn’t necessary.
We started the hike from the red gate that’s just past the last bend of the road out of Trøllanes, before you reach the tunnel. There is a small lay-by where you can park. Keep in mind if you use this route that the gate is intended to keep sheep on the mountain, so close the gate!
The other route is from the town. Park your car in the middle of town near the public bathroom, then follow the road to the north end of the town, just past a large red barn. After the pavement ends, you’ll come to a red gate. Go through the gate, and be sure to close it behind you.


The Route:
Sheep have done a remarkable job about wearing their own trails into the landscape. You’ll be walking uphill for a small portion of this hike, but this is more of a gradual ascent and not very steep. Most of the hike is quite level, but the trails are narrow since you’ll be following in the nimble footsteps of sheep.
Once you reach the lighthouse, you can continue out on a promontory towards the east. The trail is once again narrow, but even more so it’s extremely windy. Be careful with your footing and your gear.
Total Distance: about 2 to 3 miles round trip, depending on the route you take
The Details:
If you’re entering from the roadside gate, find a sheep trail that’s heading slightly up the hill in front of you and towards the water (you want to be walking towards the town but up and away from it). You’ll want to curve alongside the mountain, but not climb up it too much. After about twenty minutes of walking, the trail should flatten out and the lighthouse should be in your view. From there, it’s a relatively straight shot toward the lighthouse
If you’re heading from the gate in town, the route will look roughly the same. Find a sheep trail that’s gently heading uphill, then when the lighthouse comes into view keep on the trail that’s in the best condition to take you there.
While the most direct way to reach the lighthouse will be to find a sheep trail and stick to it, you can also choose your own route that’s as direct or as indirect as you want it to be. This can be preferable as the sheep trails tend to get quite muddy!
There’s a small ascent to actually reach the lighthouse. The structure itself is nothing special, but provides welcome relief from the winds that whip up this portion of coast. If you want to get the iconic shot of the lighthouse against the exposed cliff edge, follow the trail that goes out toward the water. As we mention above, the route is narrow and windy so take care.
The return is the same route you took to get out, just retrace your steps and follow the sheep trails. The view over Trøllanes is lovely and quaint, so definitely be sure to stop, take photos and enjoy the view.

Bonus Hike
After we completed the hike to Kallur Lighthouse, we met the lovely, chatty farmer who owns the land. He told us about another hike that people are enjoying in the area (and is a popular photo destination), which goes directly up the mountainside to give you a panoramic view of the mountain bowl around Trøllanes. The hike departs from the red gate on the road toward the tunnel, after which you blaze your own trail directly up the mountainside in front of you, towards a metal pole situated at the top. It’s extremely steep, and you’ll likely want to devise some of your own switchbacks as you climb. Depending on your fitness, anticipate the climb up taking about forty minutes. Your efforts will be rewarded with stunning views off the cliff-top towards the west and impressive views of the scalloped mountains to the east (see above).
Hvannhagi
Located on the Faroe Islands southernmost island Suðuroy, Hvannhagi is a bit out of the way for most tourists. It doesn’t make many best-of lists, but it’s a must-do if you’re visiting Suðuroy. The hike has it all. Great views, gentle ascent, flat portions and steep narrow bits. It even has a sheep gate in the middle!
The Trailhead:
Starting from the hospital in Tvøroyri (the main city in Suðuroy and where you’ll get dropped off by the ferry), walk up and out of town following the street Ovari Vegur to the northwest. After about ten minutes of walking (though it may feel longer), you’ll reach a gate and a sign that says Hvannhagi. This is the trailhead.
The Route:
You’ll start off with a short steep climb, which quickly gives way to a more gentle, nearly flat ascent. After walking through the saddle of two peaks, you’ll pass through a sheep gate, go down a steep descent which skirts a mountain, and then further sloping down towards Hvannhagi. To return, you can either follow the same trail or continue hiking past Hvannhagi lake and up through a gorge before rejoining the trail back into town.
Total Distance: Between 5 and 6 miles round trip, depending on which route you take
The Details:
Once you see the sign that says Hvannhagi, pass through the sheep gate and follow the trail. It will head straight up a peak initially, but quickly levels out as you skirt around the peak and towards a small valley. On a clear day, you’ll have amazing views down into Tvøroyri and across the water toward Lítla Dímun, Stóra Dímun and Sandoy.
As you continue to follow the trail, you’ll slowly begin to descend around the back portion of the hill adjacent to the one you first climbed up. You’ll pass through a sheep gate, and immediately after there’s a portion of the trail that’s quite steep. It’s only a few steps, so find your footing and continue. The trail, as it skirts around the back of the mountain toward Hvannhagi is relatively flat, but quite narrow and muddy, which can make it feel slow going or more difficult than you may expect. This trail has been worn quite deep into the ground, so you’ll have burrows of grass a few inches above your feet.


After about twenty minutes of walking, you’ll see Hvannhagi – it’s the lake surrounded by mountains! Walk down to the lake’s shore, take photos on the grass mounds surrounding it, and enjoy the view.
We followed the same trail to leave, but the Faroe Islands hiking guide has a good description of how to continue through the gorge, should you choose to do that.

2 thoughts on “3 Best Day Hikes in the Faroe Islands”